How to Photograph the Moon – Guide & Settings + 5 Tips for Moon Photography
You want to photograph the moon but don’t know how? With the right settings, a few tips, and the right equipment, getting a good moon photo is no problem at all.


Photographing the moon is fun and fascinating. We photographers keep trying to capture the moon’s detailed surface, with its seas and craters, in pin-sharp images. It’s a challenge that’s often hard to master. In this article you’ll learn how to take impressive moon photos and get practical tips and answers to refine your photographic skills.
I’ll explain which camera settings you should use, which gear is particularly well suited and what to keep in mind in general if you want to take really good photos of the moon. You’ll also learn how to take good moon photos with your smartphone and make it appear especially large.
Das erwartet dich im Beitrag
How to Photograph the Moon
If you want to plan your moon photo precisely, use my exposure-time calculator for moon photography:

The good news: moon photos are easy to take. You don’t even need expensive camera gear for a good moon shot – just a cloud-free sky, a sturdy tripod and a camera with a telephoto lens.
But first you should check that the moon is visible at all. The following table shows you when there’s a full moon in Germany in 2026 and when you can take the best shots.
Photographing the Full Moon – Moon Phase Dates for 2026
| Moon phase | Date |
|---|---|
| Full moon | Oct 26, 2026 |
| Full moon | Nov 24, 2026 |
| Supermoon | Dec 24, 2026 |

Photographing the Moon: Camera Settings
Now that you know when you can photograph the moon, let’s look at the “how”. The moon is basically nothing more than a rock lit by the sun. That means you don’t need long exposure times to get a sufficiently bright photo of the moon.
With the “f/11 rule” you can easily take a good photo of the full moon. These are the settings:
- f/11
- ISO 100
- 1/100 second exposure time
- Set focus to infinity (∞)
- Use a telephoto lens with at least 200mm focal length. From 400mm the shots become significantly more spectacular
- At long focal lengths you should always use a tripod to avoid camera shake
- Turn off the image stabiliser when shooting on a tripod
- With a DSLR you should set mirror lock-up and use a delayed shutter release
- Use manual camera mode – on a smartphone too
- To get the moon as sharp as possible you can use autofocus. Still, I recommend focusing manually, ideally with 10x zoom in Live View and, on a mirrorless camera, with focus peaking active.
- At very long focal lengths you have to keep the shutter speed much shorter
- Keep ISO as low as possible
- Open up the aperture if your shutter speed is too long
- Shoot in RAW instead of JPG to get a moon photo that edits well
With these settings you’ll get a photo of the moon that’s worth seeing. Of course you’ll also have to adjust ISO and exposure times a little depending on the moon phase.

Common Mistakes in Moon Photography
The most common mistakes made with moon photos are probably:
- Wrong or too long exposure times. For example, if the moon is just a bright blob, the exposure was too long.
- Auto mode and flash switched on. Firing the camera’s built-in flash at the moon won’t do anything, because it’s far too far away.
- Image stabiliser active
- Camera shake from wind
- A poor tripod loaded beyond its capacity
- Vibrations from movement
Calculating the Maximum Exposure Time
Here you can calculate the maximum possible exposure time for any focal length at which you’ll still get sharp photos of the moon:
The Right Gear for Moon Photos
I’ll explain exactly which gear is best suited to photographing the moon so your moon photos get even better. Let’s start with the most important thing for moon photography – a sturdy tripod. A good tripod is essential for a decent moon photo! For all my moon and Milky Way photos I use the Rollei C6i tripod*, which offers plenty of stability and adjustment options. Please don’t buy a €25 tripod – that’s money thrown away, because those tripods offer hardly any stability. The tripod helps you avoid camera shake when photographing the moon. Besides the camera, it’s the most important tool.

Rollei C6i Carbon Tripod
A sturdy, recommended tripod for moon photography – compatible with all cameras and with a handy ball head. The Rollei C6i is particularly stable and easily carries heavier cameras too. I use it myself on every photo trip.
Pros
- popular, sturdy tripod
- I use it regularly myself
- ball head
- affordable carbon tripod
- versatile adjustment
- high load capacity
Which Camera Do I Need to Photograph the Moon?

Moon photography really is very simple: the moon is the brightest object in the night sky. It reflects so much sunlight that we don’t need an expensive camera to capture enough light. Even smaller bridge cameras, a simple DSLR or your own smartphone will do.
Photographing the Moon with a Smartphone
Yes, you can take nice moon photos with a smartphone too. Of course you can first work with the smartphone’s zoom to bring the moon closer. But you won’t get impressive moon photos that way. I’d rather recommend attaching a monocular to the smartphone. That lets you capture the moon much larger and in more detail. There are also clip-on telephoto lenses for smartphones, but unfortunately they’re no good and a pure waste of money. By the way, your smartphone should allow manual exposure control – or at least have exposure compensation – otherwise your moon photo will just be a bright, washed-out circle.
Monoculars with a smartphone mount are already fairly cheap, and you can also use them to watch birds and other animals. However, you’ll be shooting handheld with them. And be aware that the image quality doesn’t come close to that of “real cameras”:
Here I’ll show you a photo I took with my smartphone (Pixel 7a) and such a monocular.


10×50 Monocular Telescope
A monocular with a smartphone mount and tripod. It makes it comparatively easy to photograph and enlarge the moon with your smartphone. The important thing is to focus manually and to control the smartphone manually as well.
Pros
- Good optics with good sharpness
- good build quality
- lots of accessories
- also useful for hiking
Cons
- Attaching the smartphone is a bit fiddly
- the tripod could be sturdier
Moon Photography: Cameras with Interchangeable Lenses
Cameras with an MFT sensor, an APS-C sensor and full-frame cameras are ideal for moon photos, because they make it much easier to achieve very good image quality.
Yes, among bridge cameras there are some models that offer the equivalent of 64x to 125x zoom. That’s basically comparable to the magnification of a telescope! Personally, though, I wouldn’t buy such a bridge camera for moon photography, because the image quality quickly reaches its limits at such zoom levels.

If I want to achieve such extreme magnifications for a moon shot, I’d rather use a telescope for moon observation and attach my camera to it. Because not only is the quality of the moon photo better, the whole thing is also much cheaper. More on that in a moment.

It’s fair to say that most hobby photographers probably use entry-level cameras with interchangeable lenses. The Sony Alpha 6000 or the Canon EOS R50, for example. With these cameras you can already take very good, high-resolution moon photos. If you don’t have a camera yet and want to get into moon photography, I recommend the following camera:

Canon EOS R50 with RF-S 55-210mm Telephoto Lens
A very popular mirrorless camera, 24.2 megapixels, a system camera – suitable for photography beginners and, with a telephoto lens, ready for your first moon photos.
Simple and intuitive to use – the Canon EOS R50 isn’t just for moon photos. Thanks to its small size it often comes along on trips too.
The 55-210mm telephoto lens included in the bundle is great for photos of the moon.
Lenses for Moon Photography

Since the moon is on average a full 374,000 kilometres away from us, it makes sense to use a telephoto lens to photograph it. A telephoto lens “brings distant objects closer”. You can picture it like a pair of binoculars, where everything looks slightly magnified. We want to use this effect in moon photography to capture fine details of the moon’s surface. You can probably already guess: with a wide-angle lens or the kit lens that comes with some entry-level cameras, you won’t be able to take spectacular moon photos, because the moon appears very small. So if you want to photograph the moon as frame-filling as possible, you need a telephoto lens with a long focal length! Focal lengths from 250mm are particularly suitable for moon photography. The good thing is that telephoto lenses for moon photography aren’t necessarily expensive, because they don’t need to be fast – after all, the moon is very bright.

Warning: online you’ll find lots of “cheap” manual-focus telephoto lenses from the Far East. They mostly range between 500mm and 800mm and cost €100 to €200. I can tell you that these lenses are all absolutely useless and won’t deliver satisfyingly sharp moon images. These optics are full of aberrations. Best steer well clear of them!


TTArtisan 500mm F6.3 Manual Telephoto Lens
An affordable telephoto lens with manual focus and good imaging performance. Available for all common camera mounts. The 500mm telephoto is ideal for getting started in moon photography.
Pros
- Affordable
- good image quality
- rugged design
Cons
- Manual focus
- vignetting on the Sony E version
- heavy
Details
- 500mm focal length
- full-frame compatible
- good image quality
- f/6.3 aperture
- Minimum focus distance: 3.3 m
- Extra-low dispersion elements and MC multi-layer coating
- With tripod mounting ring
- Available for Canon EF & RF, Sony E, Nikon Z, Panasonic / Sigma / Leica L mount
- All-metal housing
- Metal lens hood
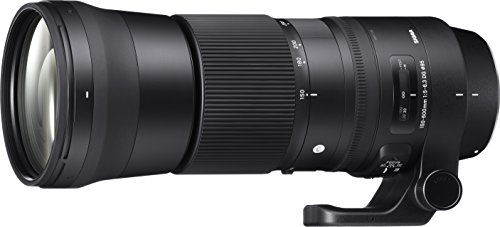
Sigma 150-600mm F5-6.3 DG OS HSM Contemporary
A very sharp, high-quality telephoto lens, the most affordable 600mm zoom on the market, and perfect for wildlife photography too – big, heavy and pricey, but usable not only for moon photography but also in many other fields of wildlife photography, which is why I recommend it here.
Pros
- wide zoom range
- image stabiliser
Cons
- heavy

Canon RF 800mm F11 IS STM
Extremely sharp and high quality, a super-telephoto lens for the EOS R series, perfect for wildlife photography too, but unfortunately costs around €1,000 – a comparatively compact 800mm super-telephoto that’s ideally suited both to moon photos and to wildlife and safaris.
Pros
- Very long focal length
- Compact
- Strong stabiliser
- Affordable compared to other 800mm lenses
Cons
- Fixed f/11 aperture
- High ISO values needed
Details
- Super-telephoto lens
- Light, small super-telephoto for beginners
- Very strong image stabiliser allows handheld shots
- Very good image sharpness
- Focal length: 800 mm
- Weight: 1260 g
- Suitable for: wildlife, sport; stabilised: yes
- Lens type: telephoto lens
Moon Size at Different Focal Lengths
The following moon gallery shows you the size of the full moon on a full-frame sensor for focal lengths from 100mm to 2000mm:

Mein Preset-Paket "Marlene"
Du magst meine Fotos und den Bildlook? Dann sind meine Marlene Presets für Lightroom genau richtig für dich!


By the way, moon shots from 800mm up already show clear atmospheric turbulence and the moon is no longer rendered perfectly circular: it “shimmers”, which reduces the moon’s sharpness. On cold winter nights or in calm weather this effect is somewhat smaller. Of course you can also take nice moon photos with shorter telephoto lenses like 135mm. And naturally you can photograph the moon with a wide-angle lens too – especially when it’s about getting the landscape into the shot. But you’ll never capture as much detail that way as with a telephoto lens.
Should I Buy a Teleconverter for Moon Photography?
Teleconverters extend the focal length by a factor of 1.4 or 2, turning a 300mm telephoto into a 420mm or 600mm lens. At the same time, the lens’s speed is reduced by one or two stops, and with the 2x converter sharpness is slightly reduced. Surely more focal length is better for moon photos, right? My clear answer: it depends on what you plan to do with the converter. If you’ll only use it for moon shots, I don’t think a teleconverter is worth it. Because for the same money you can get a telescope that lets you take much better moon photos and explore the night sky. I explain how to photograph the moon with a telescope in a bit.
If, besides moon photography, you’re also interested in bird and wildlife photography, or you go on safari, then a teleconverter is of course a great thing.
Photographing the Moon with a Landscape

Of course you can also take creative shots of the moon and landscapes with a wide-angle lens. Especially when the full moon is in the sky at night, you get breathtaking light in landscape photography.
The important thing is to be aware that you can correctly expose either the moon or the landscape. Doing both at once won’t work, because the moon is much brighter than the landscape. To get around this problem, you have to combine two shots, for example in Photoshop.
Lunar Eclipse: Photographing the Blood Moon
If you want to photograph a lunar eclipse, you’ll need different camera settings and a bit of patience. Because when the moon moves into the Earth’s shadow, not much light reaches us on Earth any more. So you have to increase the exposure time – partly to 1/10 or 1/25 second – and raise the ISO value considerably. If you can open the aperture on your telephoto lens, you should do that too. ISO values of 6400 or 12800 are normal if you’re not using a fast telephoto lens.

Here it’s worth taking many shots at much higher ISO and then “stacking” them afterwards to compute out the ISO noise.
But you get the best image quality of a lunar eclipse when you combine several shots into an HDR photo.

Photographing the Moon with a Telescope
One way to photograph the moon as large and detailed as possible is to attach your camera to a telescope using a T2 adapter and point it at the moon. This turns your telescope into a lens and you get an impressive moon photo with much higher magnification. Because telescopes often have very long focal lengths and very good imaging quality – provided it’s not an extremely cheap telescope with poor optics. A T2 adapter doesn’t cost much, and there’s a T2 adapter for every camera mount. This effectively turns the telescope into the camera’s lens – with an extremely long focal length.

For as little as €170 you can buy a telescope with 1250mm focal length that’s great for photographing the moon.
Important: for this you need a sturdy tripod or a telescope mount, because at these extreme focal lengths you see every little wobble in your images straight away. So on a DSLR, switch on mirror lock-up and a ten-second timer.
Tip: if you use a telescope for your moon photos, I recommend triggering the camera via an app or a remote release to avoid vibrations. Below I list a few entry-level telescopes that are suitable not only for moon photography but also for observing and photographing the planets.

Omegon N 114/900 EQ-1 Reflector Telescope
- Ideal for getting started in the world of astronomy: the telescope gathers 265x more light than the eye.
- Discover lunar craters, Saturn with its rings, Mars, the stellar nursery of the Orion Nebula and much more …
- A complete astronomical telescope with accessories and precise tracking: this keeps objects comfortably in the centre of the field of view.
Pros
- Great entry-level telescope
- Comes with mount and tripod
Cons
- The tripod could be sturdier
One more tip: with moon photos through a telescope, try to keep the exposure time as short as possible and ideally always stay under half a second. But now I want to know whether you had success with the moon. Feel free to leave me a comment – I’ll definitely reply!
By the way: I’ve also written a big tutorial on how to photograph the Milky Way. Maybe that’s something for you?